Author: Mark A. Latino, President, Reliability Center, Inc.
This case history takes place in a packaging facility in Virginia. The packer on module E5 was checked for vibration integrity during a pre-machine care evaluation. A problem was detected in the folding arm gearbox. The frequency characteristics indicated a bearing was deteriorating.
This seems very straight forward; now let’s put the reality of the situation into the problem detected. The gearbox is located in a section of the packer that is not easily accessible. To do the necessary repairs it will require separating the two sections of the machine. When the packer is split it will take an additional two days of work before the unit can be restored to service. The maintenance leader is not a believer in the ability of the technician to make a vibration call correctly. He has vowed to bring the technician and the technician’s boss under the scrutiny of the organizations leadership for poor performance if the call is wrong. The product this packer is packing is in a sold out position.
With this reality understood other dynamics come into the situation. Now the technician and the boss discuss their confidence level in the vibration call they have made. The added pressure of the maintenance leader has caused the vibration technician to look for other means to confirm the call to replace the gearbox bearing.
The original call was based on a vibration signature that showed a frequency peak at 36.9 with harmonic side bands at amplitude of .10 inches per second (IPS). What this means is there is frequency where there is not supposed to be. The amplitude of this frequency by most standards is not considered to be a serious problem and the machine was running fine. Not a good set of circumstances to ask for repair work to be performed. In order to be confident in the call several things must be done, first is to go back and look at the trend data on this particular gearbox. This was done and fortunately the data was taken on a regular basis (once per month), which was exactly what was needed to determine how fast the deterioration was taking place. The second thing done was to retrieve the packer’s gearbox drawings and find out exactly what kind of bearing was installed in the gearbox, what it was driving, the particular gear that was installed, etc. The last thing done was to explore other alternative tests that could be performed to increase the confidence of a correct call.
After looking at the drawing it was determined the bearing was a 1208 roller bearing. With this information the technician could look more closely at the match of frequency placement to the characteristics of the bearing. The results were close but not on the money. The frequency placement and the bearing characteristics were off by a small amount; this added some doubt about the original call. Now what? Back to the trend data once again the frequency was so close and had all the characteristics of a bearing based on past experience, that the reliability management was convinced the problem was a bearing and that over a four month period had doubled in amplitude. If this gearbox were to fail catastrophically during operation the loss would calculate to several million dollars in parts, labor, and lost production opportunity. This was significant and the call had to
be right.
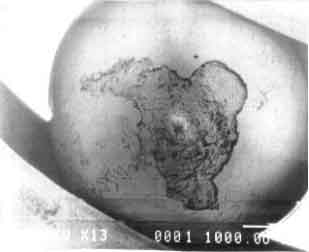
The technician had explored other tests that could be done to add confidence to the call and decided to use fiber-optic technology to take a visual look at the bearing. The equipment was borrowed from a sister plant and set up behind the packer. This particular unit had a visual monitor attachment, which enabled several people (including the maintenance leader) to view the test live as the camera was viewing the bearing. The packer was shut down, the oil drained, and the inspection covers were removed for access. There was just enough room for a smaller person to get far enough in to do the inspection. The results were conclusive the visual images showed the damage on the bearing rollers see figure 1 below.
Now there was complete confidence in proceeding forward with the repair. When the maintenance crew had completed the removal of the gearbox assembly a thorough visual inspection was conducted in order to determine the failure mechanism. The results of the inspection revealed that the cam that the gearbox drove had significant damage because the cam follower bearing had failed, the closest gear to the gearbox had tooth damage, and the 1208 bearing that had shown up on the vibration signature was a double roller bearing instead of a single roller bearing as the drawing had indicated. This explained why the frequency placement didn’t line up. The primary failure was the cam follower bearing had failed the secondary failures were the 1208 bearing damage, Cam damage, and gear damage.
After the work was completed and the equipment restored to service the lessons learned were explored.
1. The trend data was significant in making a correct call without it there would have been too many gaps for a confident call.
2. There are two different roller configurations in the stock room with the same stock number.
3. The cam follower bearing was too delicate for the service it provided.
4. The maintenance leader is now confident in the technician’s vibration calls.
5. Other reliability tools should be purchased for the facility such as a fiber-optics camera.
The job of the reliability department as far as this writer is concerned is to Trend, Trend, and Trend. Trending is the primary activity a reliability department depends on to learn failure mechanisms. The understanding, documentation, and sharing of reliability lessons learned are the future of a company’s success.
About the Author
Mark Latino is President of Reliability Center, Inc. (RCI). Mark came to RCI after 19 years in corporate America. During those years a wealth of reliability, maintenance, and manufacturing experience was acquired. He worked for Weyerhaeuser Corporation in a production role during the early stages of his career. He was an active part of Allied Chemical Corporations (Now Honeywell) Reliability Strive for Excellence initiative that
was started in the 70s to define, understand, document, and live the reliability culture until he left in 1986. Mark spent 10 years with Philip Morris primarily in a production capacity that later ended in a reliability engineering role. Mark is a graduate of Old Dominion University and holds a BS Degree in Business Management that focused on Production & Operations Management. Mark can be reached via e-mail at
mlatino@reliability.com or phone at 804-458-0645.


