When visiting plants in different corners of the world, IDCON is often asked: “What are the current best practices for preventive maintenance (PM)?”
IDCON usually answers that they define preventive maintenance using 95 key elements.
IDCON also points out, to some people’s dismay, that there is no single silver bullet for improving PM, but rather many combined efforts will be required to eventually yield results.
Here are a few key elements that have been extracted from our program of Current Best Practices (CBP) along with test questions and best practice (BP) examples to help you gauge how well your plant practices measure up.
1) Do you have a definition for preventive maintenance?
Interview test: Ask people in maintenance and operations to define what is included in preventive maintenance.
BP example: We have a definition of preventive maintenance that is documented, understood, and well-communicated across our plant.
Having a definition of preventive maintenance is important for good communication in meetings, improvement efforts, and training seminars.
For example:
- Are detailed cleaning, balancing, and alignment part of preventive maintenance?
- Is operator inspection part of Preventive Maintenance?
- Are operating practices part of Preventive Maintenance?
We have often attended meetings or interviews where we are told a plant is continuously working on improving preventive maintenance.
When we ask for the plant’s definition of PM, we notice that there are as many definitions of PM as there are people.
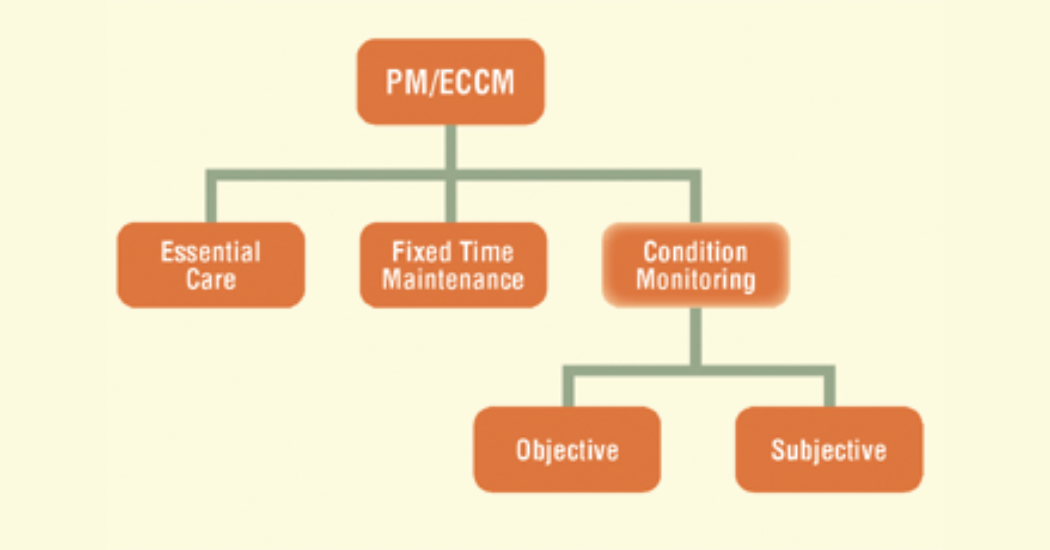
How can we expect to improve PM if we are not clear on what PM really is? We define PM as essential care and condition monitoring (PM/ECCM) as shown in Fig. 1. Perhaps you can use the definition in your plant.
2) Do you know how satisfactory preventive maintenance is done today?
Test: Ask the plant manager, maintenance manager, and operations manager for the PM improvement plan. If there is one, is it specific with timelines? For example: “Lubrication storage improvement complete by September 2003.”
BP: Plant management is aware of the strengths and weaknesses of the PM program. The plant, therefore, has specific plans and timelines in place for improvement actions.
The experience of Ian Farrell, maintenance manager at UPM-Kymmene in Scotland, illustrates the awareness factor.
Farrell, whose company has deployed the CBP education and training assessment in several plants in the United Kingdom, expressed the experience of interviewing people in the plants in a presentation at a recent maintenance conference.
“We interviewed people in the plants to get a good idea of how well PM is done. When initially asking a person how well PM is done in the plant, the first answer is ‘Yes, we do this all the time.’
After some more discussion and specific questions around PM, the interviewee changes the statement to ‘Well, we probably do this most of the time.’
After more small talk and several cups of coffee and more explanations around PM the interviewee states, ‘I know we definitely, sometimes do it.’
“The questions become more specific and the interviewee downgrades the statement to ‘I think we do it.’
Time passes and the questions around, alignment standards, condition monitoring routes, and operator involvement make the interviewee think of what good PM really is, and the statement is changed to ‘Somebody told me we did it.’
When we finally have defined what best practices in preventive maintenance are and there is a stack of coffee mugs, the person muses, ‘We used to do it all the time.’”
By first defining what PM is, and then educating and training people in the current state of their actual PM performance, the groundwork for improvement is laid.
3) Do you have an alignment standard, and is it followed?
Test: Ask for an alignment standard and check quality of standard. Go look at equipment for signs of good or poor alignment.
BP: There is a well-documented alignment standard. More importantly, the standard is followed.
In a world-class reliability and maintenance organization, all alignments are done to 0.002 in. (0.05 mm) for equipment running below 3600 rpm and 0.001 in. (0.025 mm) for equipment running above 3600 rpm.
There is a well-defined alignment standard explaining how to set up, clean, check for pipe strain, check for soft foot, etc.
Take a tour of your plant.
If alignment is done well there are jacking bolts (push bolts) installed on all motors, gears, and other equipment of significance.
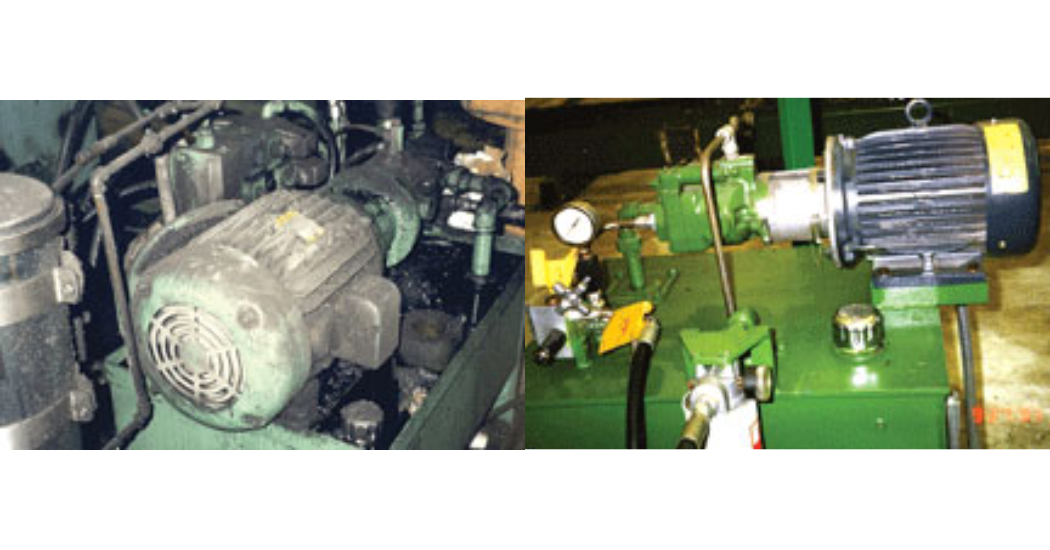
Fig. 2. Left: A motor has not been aligned properly. We can clearly see the beat marks from the sledgehammer, the motor is missing push bolts, and there are too many shims under the feet. Right: A motor with the correct set up to enable good alignment
Bases and foundations are in good condition and no more than four shims are used under the motor feet (Fig. 2). Overall vibration level is low in the plant (0.1 in./sec unfiltered average). As a tracking indicator, see if alignment records are kept for each alignment job.
4) Do you have a lubrication standard, and it is followed?
Test: The standard should include storage, handling, filtering, and cleanliness of lubricants. Visually check the cleanliness of storage areas and handling.
BP: There is a well-documented lubrication standard. More importantly, the standard is followed.
The cleanliness standard for each piece of equipment should match the clearances in the equipment’s lubricated surfaces.
For example, a hydraulic unit may need to be filtered down to 3 microns (200 beta) and a gearbox to 12 microns (75 beta).
In order to reach the right cleanliness levels of lubricants, oil and grease have to be stored, handled, and filtered correctly.
Few people know that new oil usually is delivered at around 40 microns cleanliness level, which means that oil going into equipment with fine clearances should be filtered.
5) Are inspections (condition monitoring) done where it is cost-effective to do so?
Test: Go through inspection lists, check the level of detail, and make sure the route is actually completed.
BP: There are inspection routes for all mechanical, electrical, and instrumentation equipment (where it is cost effective to have inspections).
In a top-notch plant, inspections are documented and completed according to schedule. The plant is using an inspection list or, even better, a handheld computer.
The list or handheld computer describes exactly what to do for each inspection. The inspections are a combination of measuring condition and subjective (look, listen, feel, smell) inspections.
Most inspections are completed while equipment is operating because we do not want to waste valuable shutdown/offline time on inspections that could be done on the run. Inspections can usually be done better when equipment is operating.
For example, a pump cannot really be inspected well when it is down since there are no vibration, no operating pressures, and no seal water flow.
To see if your plant is performing according to world-class reliability and maintenance standards, take an inspection list, or handheld computer (if you do not have inspection lists, it is time to develop them), and walk the route.
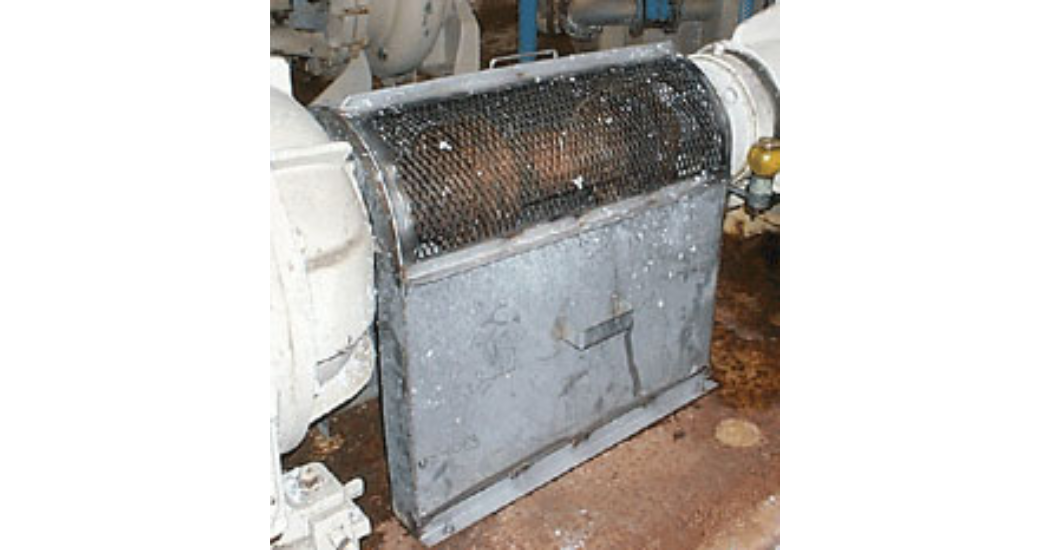
Fig. 3. This equipment guard allows for on-the-run visual inspection.
For example, check the following:
- Do we have condition monitoring routes covering all necessary inspections?
- Do we use simple inspection tools such as a stroboscope, infrared thermometer, vibration pen, industrial stethoscope, bright flashlights (500,000 candela), and inspection mirrors?
- Can we inspect couplings, belts, and chains on the run, or do guards make it impossible (Fig. 3)?
- Are inspections being done? Are oil glasses clean enough to see oil levels, are base bolts clean enough to check tightness,etc.?
- Are people educated and trained in basic inspection techniques?
6) Is detailed cleaning of equipment done well?
Test: Take a walk in your plant and visually check the cleanliness and condition of the equipment.
BP: Detailed cleaning of equipment is done consistently. Dirty areas are redesigned in order to protect equipment from contamination.
Detailed cleaning can be checked easily.
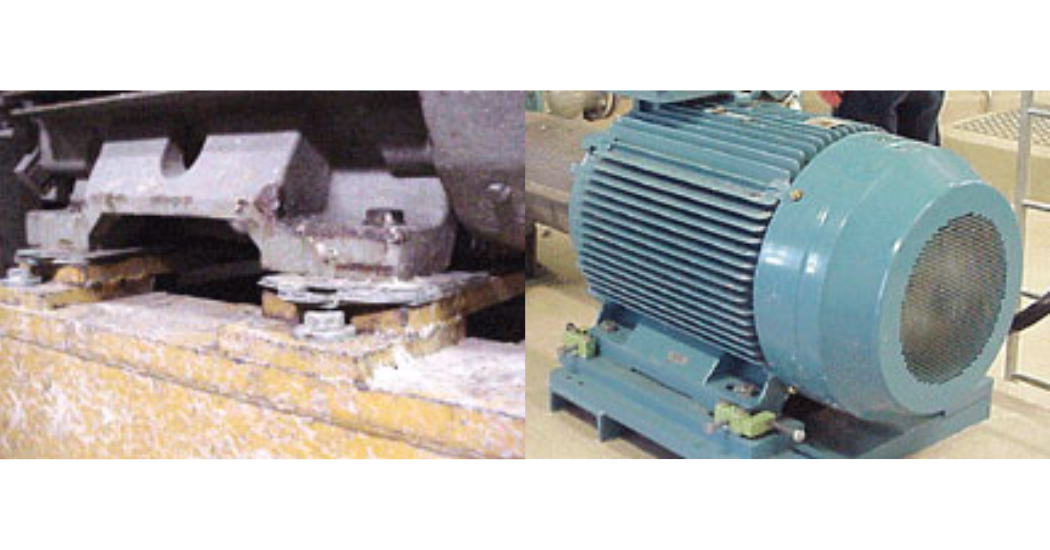
Fig. 4. The hydraulic unit on the left would take 20-30 min to inspect and identify leaks, while the hydraulic unit on the right can be inspected for leaks in about 10 sec by looking for oil in the pan underneath the unit.
For example, a clean hydraulic unit can be inspected for leaks in about 10 sec by taking a quick look at the pan underneath the unit (Fig. 4). A dirty hydraulic unit would take 20-30 min to check for leaks.
7) Is an ultrasonic or vibration monitor used when greasing bearings?
Test: Check lubricator’s equipment.
BP: Vibration or ultrasonic levels (or another method) are checked while greasing in order to apply the correct amount of grease.
Greasing is done by measuring ultrasonic or vibration levels while applying grease to the bearing.
It is almost impossible to know how much grease is applied to a bearing without a measurement.
The measurement tools indicate to us when the grease hits the bearings and monitor the vibration or ultrasonic levels as grease is squeezed into the bearing.
Over and under greasing can be avoided by using the right tools. An alternate method is to use a volume meter, assuming the required grease volume for the bearing is known.
Although just a sample of the 95 points we use to evaluate plant performance, these example tests and best practices demonstrate the methodology by which one can build a system for discussing performance levels.

