Accurate measurements are essential when replacing a mechanical seal to ensure the new seal fits the pump’s exact specifications. Here’s how to go about it:
Measurements Needed:
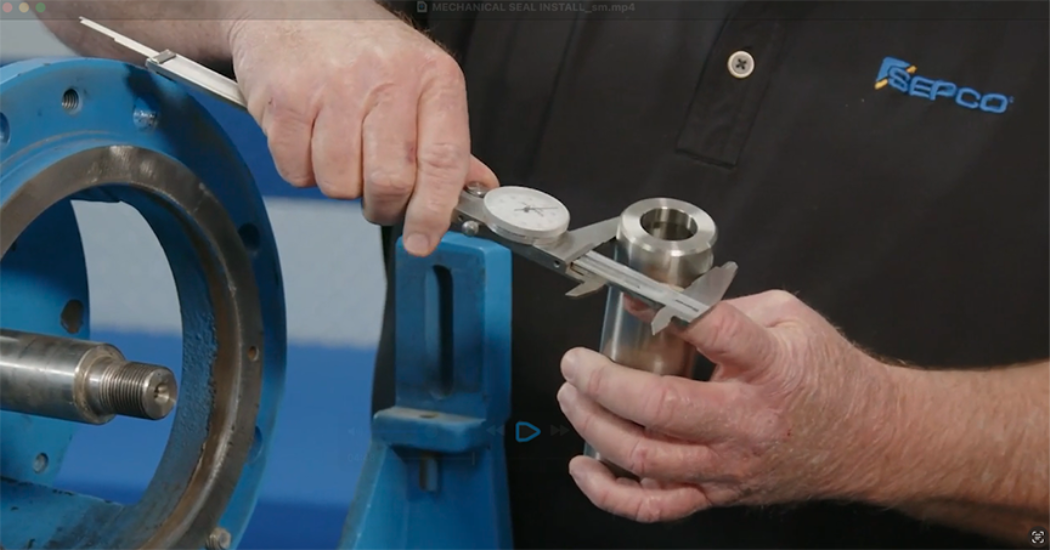
- Shaft Diameter (Sleeve or Shaft OD):
• Measurement: Measure the diameter of the shaft or sleeve where the seal will sit. This is usually given in millimeters or inches.
• Tool: Use a caliper or micrometer for accuracy. - Seal Chamber or Bore Diameter:
• Measurement: The inner diameter of the stuffing box or seal chamber where the seal’s outer diameter will fit.
• Tool: Again, a caliper or micrometer. - Axial Length (Seal Face Width):
• Measurement: The length of the seal face, which determines how far the seal extends along the shaft.
• Tool: - Gland (Seal Plate) Depth:
• Measurement: Depth from the outside of the seal chamber to where the gland or seal plate will sit.
• Tool: Depth gauge or caliper. - Stuffing Box Face to Bearing Center Distance:
• Measurement: Distance from the stuffing box face to the center of the nearest bearing. This helps in ensuring the seal’s spring can adequately compensate for any shaft movement.
• Tool: Ruler or tape measure. - Shaft Runout and End Play:
• Measurement: Check for any shaft deflection (runout) or axial movement (end play). Excessive movement can affect seal performance.
• Tool: Dial indicator. - Operating Conditions:
• While not a physical measurement, you need data on:
• Temperature
• Pressure
• Fluid Media
• Speed (rotational speed of the shaft in RPM)
• These conditions will influence the type of material and design of the seal needed.
How to Measure:
- Clean the Area: Before measuring, clean the shaft and seal chamber to ensure accurate measurements.
- Multiple Measurements: Take measurements at several points to account for any taper or wear on the shaft or in the seal chamber.
- Precision: Use tools with high precision; even slight discrepancies can lead to seal failure.
- Cross-Reference: If you have the original seal, compare new measurements with those on the seal or its documentation for consistency.
Additional Considerations:
- Seal Type: Determine if you need a single, double, or tandem seal and if it should be balanced or unbalanced, stationary or rotating.
- Compatibility: Ensure the new seal is compatible with the pump’s materials and the fluid being pumped (e.g., chemical resistance).
- Manufacturer’s Specifications: Consult the pump or seal manufacturer’s documentation for any specific guidelines or non-standard measurements.
If you’re not experienced with this process, consulting with a seal manufacturer, such as SEPCO, would be beneficial. SEPCO can help interpret the measurements and select the proper seal. Remember, incorrect sizing can lead to premature seal failure, leakage, or damage to the pump.
How to Use and Read Dial Calipers
Dial calipers are versatile tools commonly used for precise measurements in metalworking, machining, and other technical fields. They are capable of measuring outside dimensions, inside dimensions, depth, and step dimensions. Here’s a detailed guide on how to use and read them effectively.
Parts of a Dial Caliper
- Outside Measuring Jaws: Used to measure external dimensions.
- Inside Measuring Jaws: Used for internal dimensions.
- Depth Rod: Measures the depth of holes or recesses.
- Dial: Displays fine measurements using a rotating needle.
- Main Scale: Provides larger measurement increments in inches or millimeters.
- Lock Screw: Secures the caliper at a specific measurement.
Step-by-Step Instructions for Use
- Check the Calibration:
• Ensure the caliper is calibrated by closing the jaws gently and verifying that the dial reads zero. If it does not, adjust the bezel until it aligns with zero. - Measure Outside Dimensions:
• Open the outside measuring jaws slightly wider than the object.
• Close the jaws gently around the object to avoid applying too much force, which could distort the measurement. - Measure Inside Dimensions:
• Insert the inside measuring jaws into the opening to be measured.
• Open the jaws until they contact the interior walls of the object. - Measure Depth:
• Extend the depth rod by sliding the caliper’s main scale outward.
• Insert the rod into the hole or recess and note the measurement. - Measure Step Dimensions:
• Use the step-measuring edge of the caliper to measure from one surface to another.
How to Read a Dial Caliper
- Main Scale Reading:
• Locate the zero mark on the dial.
• Read the value on the main scale to the left of the zero mark. This is the measurement in inches or millimeters. - Dial Reading:
• Check the position of the needle on the dial.
• The needle indicates the fractional measurement in thousandths of an inch or hundredths of a millimeter. - Combine the Readings:
• Add the main scale reading to the dial reading for the total measurement.
• For example, if the main scale reads 1.2 inches and the dial reads 0.045 inches, the total measurement is 1.245 inches.
How to Use and Read Micrometers
Micrometers are precision instruments designed for measuring small dimensions with high accuracy. Here’s how to use and read them effectively.
Parts of a Micrometer
- Anvil: The stationary measuring surface.
- Spindle: The movable measuring surface.
- Sleeve: Displays the main scale measurements.
- Thimble: Rotates to move the spindle and shows finer measurements.
- Ratchet Stop: Ensures consistent pressure for accurate readings.
- Lock Nut: Secures the spindle in place.
Step-by-Step Instructions for Use
- Check Calibration:
• Close the spindle against the anvil to verify that the micrometer reads zero. Adjust the calibration if necessary. - Measure the Object:
• Place the object between the anvil and spindle.
• Rotate the thimble until the spindle lightly contacts the object.
• Use the ratchet stop to apply consistent pressure. - Lock the Measurement:
• Tighten the lock nut to secure the spindle in place.
How to Read a Micrometer
- Sleeve Reading:
• Read the visible value on the sleeve scale. This is typically in millimeters or hundredths of an inch. - Thimble Reading:
• Look at the position of the thimble’s scale relative to the sleeve.
• Add this value to the sleeve reading for finer measurements. - Combine the Readings:
• Add the sleeve and thimble readings to get the total measurement.
For example, if the sleeve reads 5.0 mm and the thimble reads 0.23 mm, the total measurement is 5.23 mm.
By following these instructions, you’ll be able to use and read dial calipers and micrometers with precision and confidence.
Note on measuring Bolt Circles:
To measure two and four-bolt patterns accurately, measure the inside-to-outside length to determine the center-to-center length. For uncommon or difficult-to-measure bolt patterns, most can be calculated in CAD by a SEPCO engineer.